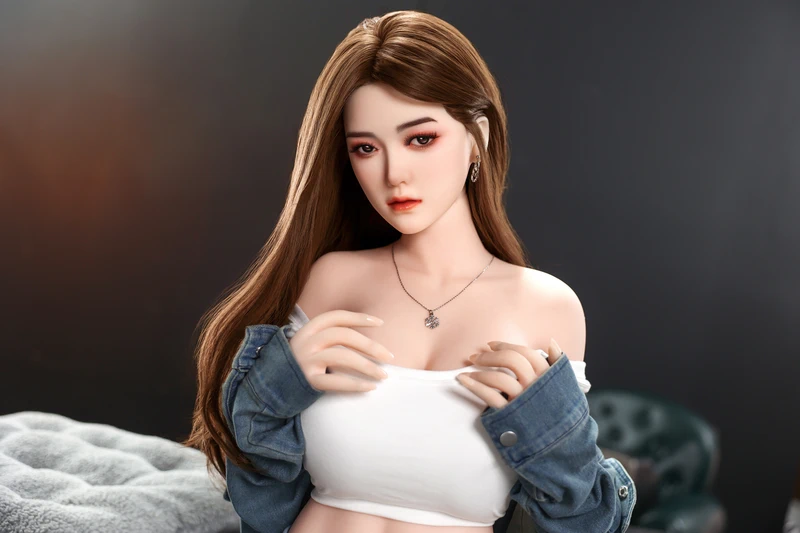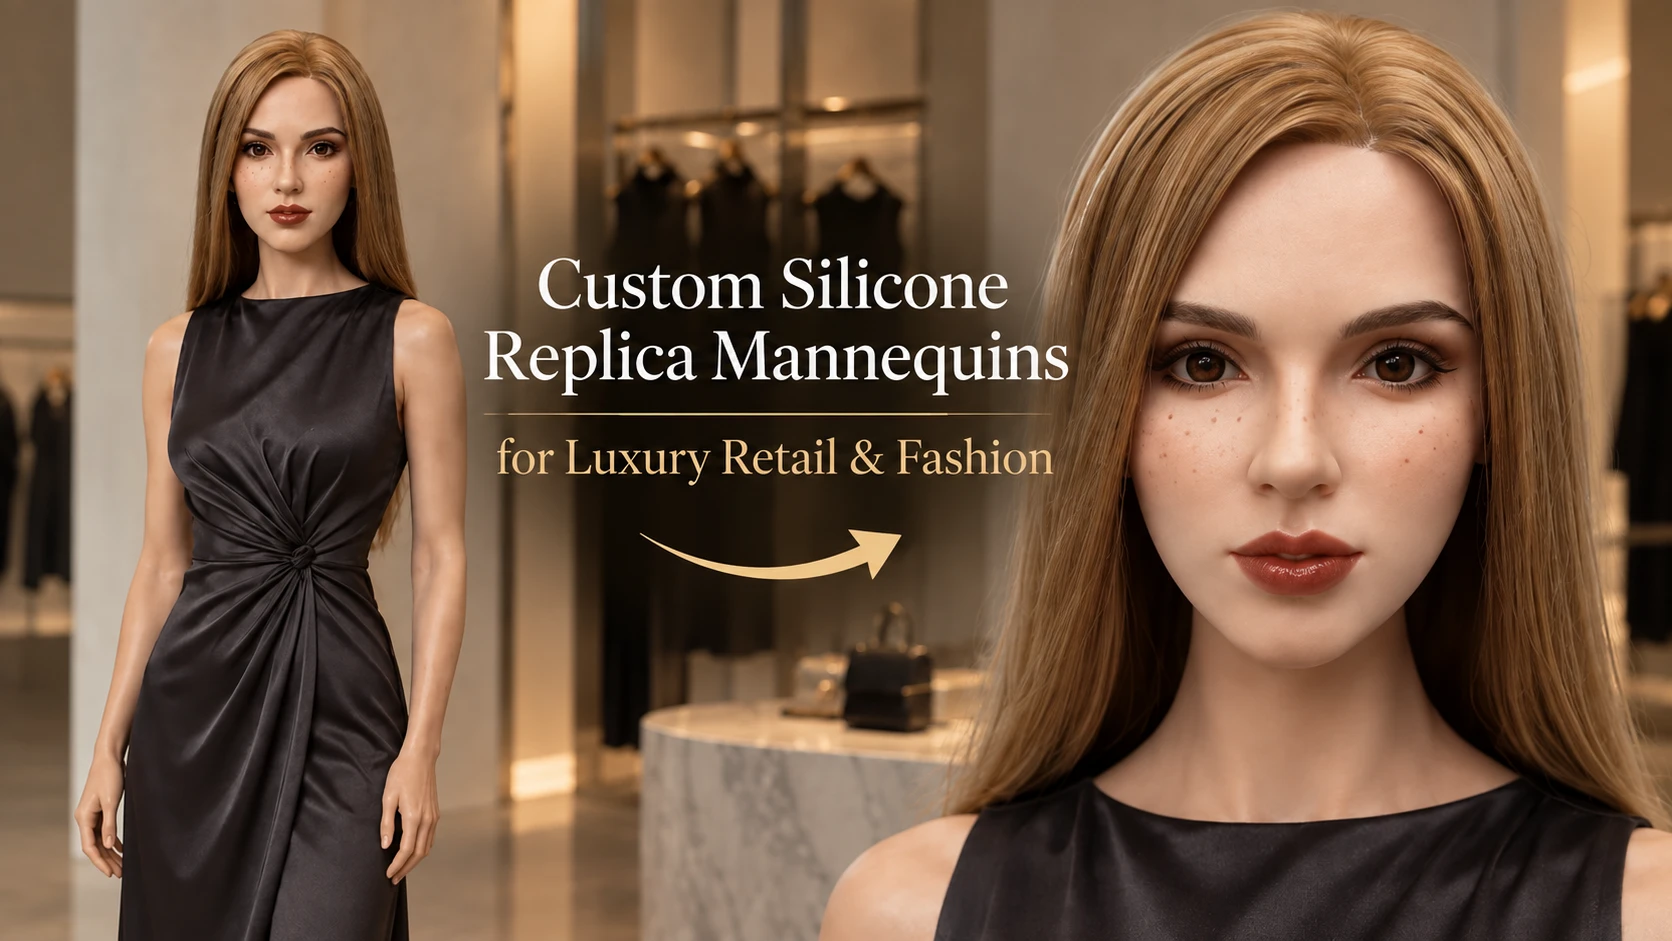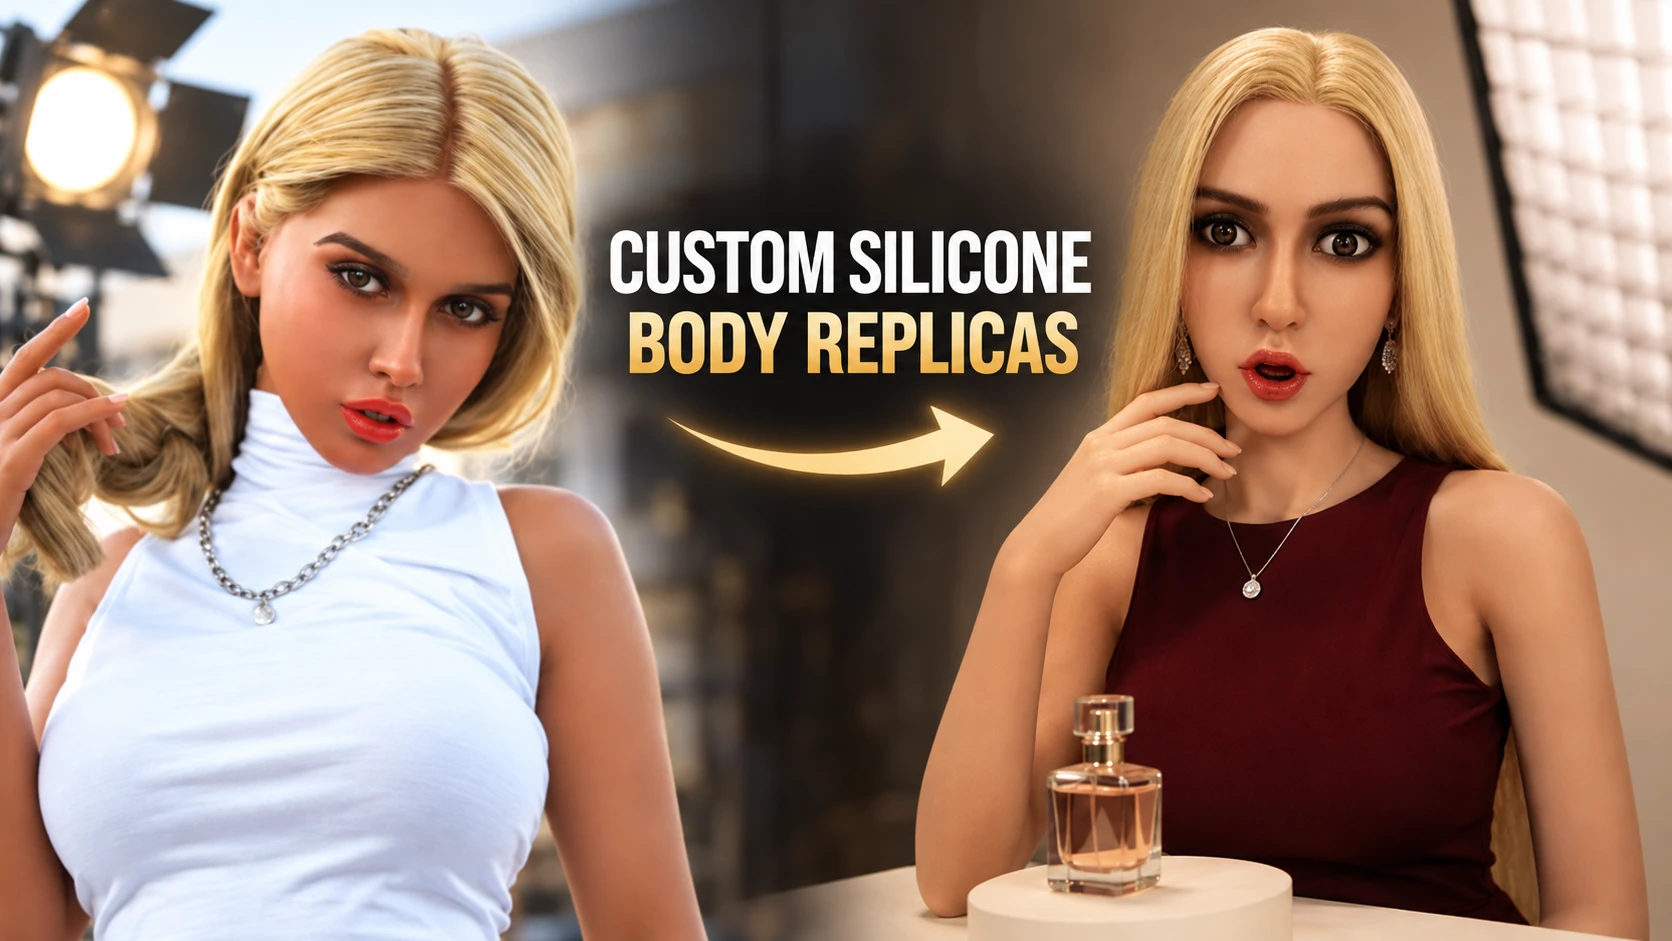
Can you clone your original character into a silicone doll if it currently exists only as anime artwork, a fantasy illustration, an AI-generated image, or a 3D model? XYlover’s custom silicone clone doll service can use these types of character references as the starting point for developing a real physical silicone character.
Your character might be an anime OC with oversized eyes, an elf with pointed ears, an alien with an unusual skin tone, a game or VRoid character, or a life-size cosplay-inspired design. The important question is not simply whether an image can be copied, but which features make your character instantly recognizable and how those features can be translated from a digital design into a three-dimensional physical form.
This guide explores what kinds of characters can be recreated, what reference images are most useful, what happens when stylized 2D or 3D proportions become full-size, and which details matter most for character similarity. You will also learn how 3D modeling and silicone production work, what “1:1” really means, which anime or fantasy features may need physical adaptation, and what to prepare before bringing your character into the real world.
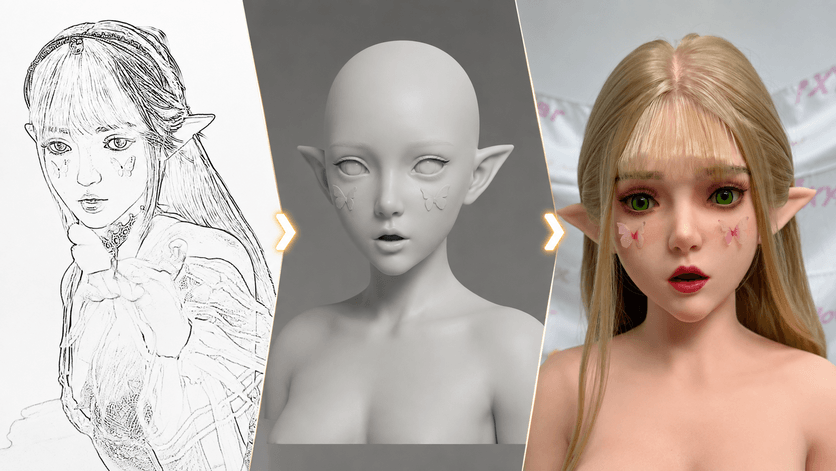
From character design to physical silicone clone doll.
Can You Turn Your Original Character Into a Real Silicone Doll?
For many character creators and fans, the starting point is not a physical product at all. It may be an anime-style illustration, an original fantasy character, an AI-generated portrait, a game avatar, or a detailed 3D model that has only ever existed on a screen.
In many cases, these materials can provide the visual foundation for developing a physical silicone character. The important question is not whether the character was created in a particular software or art style, but whether the available references clearly communicate what makes that character unique.
A simple human-style character may depend heavily on facial proportions, hairstyle, body shape, skin tone and eye color. A fantasy or anime character may instead be recognized by oversized eyes, pointed ears, unusual skin colors, distinctive markings or exaggerated proportions. Before physical production is considered, these features need to be identified and interpreted as a three-dimensional design.
What Can Be Used as the Starting Point?
You do not necessarily need a finished professional 3D model before beginning. A character project may start from several different types of visual material, including concept art, anime or manga-style illustrations, AI-generated character images, character sheets, digital paintings, sketches, Blender or ZBrush models, or other existing 3D character files.
A full character sheet showing front, side and back views is especially useful because it reduces the amount of visual interpretation required later. However, even a single clear image may be enough for an initial evaluation. Missing information—such as the side profile, hairstyle from behind, exact body proportions or details hidden by clothing—can then be clarified with additional references.
At this stage, the goal is simply to establish a clear visual direction. More detailed questions about reference images and what to prepare will be covered later in this guide.
What Does “Bring a Character to Life” Actually Mean?
Turning a character into a silicone doll does not mean printing a two-dimensional image directly into three dimensions. A character that looks convincing in artwork still needs a face profile, head depth, physical body proportions and real-world structure when it becomes a full-size object.
This is why an original character project begins with the character itself rather than simply selecting an existing face and body design. The recognizable visual identity of the character is interpreted through 3D modeling before the design moves toward physical production.
For example, an anime OC with very large eyes may need careful three-dimensional interpretation so the face still feels like the same character when viewed from the side. An elf may depend strongly on the shape and angle of the ears, while an alien character may be defined more by skin color, eyes or unusual facial structure.
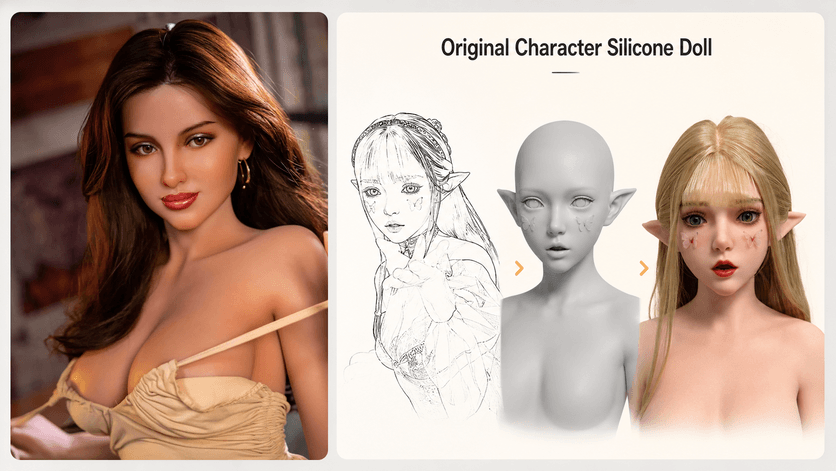
Existing design compared with a custom character creation.
What Usually Determines Whether a Project Is Possible?
Not every digital feature behaves the same way when converted into a physical form. The feasibility of a character usually depends on several factors working together: the quality and consistency of the references, the complexity of the character, its proportions, the structure of unusual features and the level of visual similarity expected from the finished result.
Some details are mainly visual challenges. An unusual skin tone, makeup pattern or eye color may primarily require careful color and finishing work. Other features can create physical challenges. Extremely thin structures, very long projecting details or exaggerated proportions may need to be adjusted so they can exist reliably as part of a real object.
This does not mean a stylized character has to become generic or lose the features that make it recognizable. The more useful approach is to identify the character's identity-defining features first, then determine how closely each one can be preserved in a physical silicone version.
That question becomes especially interesting when the character is anime-inspired, fantasy-based, non-human or already exists as a 3D game model—which is what the next chapter explores.
What Kind of Character Do You Want to Bring to Life?
Not every original character presents the same challenge when it becomes a physical object. An anime OC, an elf, an alien, a game avatar and a cosplay-inspired character may all begin as digital designs, but the features that make each one recognizable can be very different.
For some characters, the face and hairstyle carry most of the identity. For others, unusual skin colors, pointed ears, non-human eyes, exaggerated proportions or a distinctive overall silhouette may matter more. Understanding the type of character you want to recreate helps determine which details should receive the most attention when the design is translated into three dimensions.
Anime and 2D Original Characters
For anyone considering an anime-style silicone character, one of the first challenges is that anime and 2D designs often follow visual rules that work extremely well in illustration but do not always follow realistic human anatomy. Large eyes, small noses, narrow jaws, long legs, small waists and stylized head-to-body ratios can all contribute to the look of an anime character.
When an anime character becomes a physical silicone figure, one of the most important decisions is how strongly those stylized proportions should be preserved.
Some creators may want the finished character to remain visibly anime-inspired, keeping larger eyes, a narrower jaw and a more stylized silhouette. Others may prefer a more realistic interpretation that looks like a human version of the same character while preserving recognizable elements such as the hairstyle, eye color, facial expression and body proportions.
There is no single correct approach. What matters is deciding which interpretation best represents the character before detailed 3D modeling begins.
If the character comes from manga panels, character art or a single illustration, additional views can also become important because the original artwork may not show how the nose, jaw, hairstyle or head shape should appear from the side.
Fantasy, Elf and Alien Characters
Fantasy characters are often defined by features that immediately separate them from ordinary human designs. A custom elf silicone doll may depend heavily on pointed ears, pale or unusual skin tones, specific eye colors and an elegant facial shape. An alien or other non-human character may rely more strongly on unusual skin colors, eye shapes, facial markings or exaggerated anatomy.
These features should not all be treated in the same way.
A fantasy skin tone or facial marking is primarily a visual customization issue, while a very long projecting ear, horn or other thin structure also creates a physical design question. Some unusual character features may work directly within the silicone design, while others may require adjustment, separate components or another practical interpretation.
The useful question is therefore not simply:
“Can every detail be copied?”
It is:
“Which details make this character unmistakably itself?”
For an elf, the pointed ears and facial proportions may be essential. For a fantasy warrior, the skin tone, markings and silhouette may matter more. For an alien character, the eyes or facial geometry may be the strongest visual cue.
Identifying these identity-defining features early makes it easier to preserve the character even when a secondary detail needs to be adapted for physical production.

Anime, fantasy, 3D game and life-size cosplay character examples.
Game, VRoid, Blender and 3D Characters
If your character already exists as a Blender, ZBrush, VRoid or other 3D model, you already have something particularly useful: a three-dimensional description of the character rather than only a front-facing illustration.
This can reduce uncertainty about facial depth, head shape, body proportions and features that would otherwise need to be interpreted from 2D artwork.
However, a model created for a game, animation or digital rendering should not automatically be treated as ready for silicone production. It may still need to be reviewed for physical dimensions, surface geometry, proportions, mold feasibility, internal structure and other manufacturing requirements.
In other words, the question is not simply:
“Can I send my 3D file?”
Yes, an existing model can be a valuable starting reference.
The more useful question is:
“Which parts of my digital character can move directly toward physical production, and which parts need to be adapted first?”
For example, features that work visually in a game environment may depend on extremely thin geometry, exaggerated shapes or structures that do not need to support themselves in the real world. Those areas should be reviewed before the physical design is approved.
This is why an existing 3D model can shorten the interpretation stage without completely replacing the production evaluation.
Cosplay and Life-Size Character Dolls
Some projects are less about preserving exaggerated animation geometry and more about answering another interesting question:
What would this character look like if they existed at human scale?
For cosplay character dolls and other life-size character projects, the overall silhouette, face, hairstyle, skin tone, eye appearance and recognizable character styling often become especially important.
The important distinction is that life-size does not automatically mean every digital proportion should be copied without interpretation.
A character may be produced at a human-scale height while still preserving recognizable stylized characteristics. Alternatively, the creator may prefer a more realistic human interpretation of the same character.
For example, a highly stylized character could keep its distinctive hairstyle, eye color and facial identity while using more practical human-scale body proportions. Another project may deliberately preserve a stronger fantasy or anime silhouette if those proportions are central to the character.
This choice should be made according to how the creator imagines the character existing in the physical world, rather than assuming that every character must follow the same realism level.
A useful way to think about all four character types is this: the goal is not to force every anime, fantasy, game or cosplay character into the same physical template. The goal is to understand which visual traits define that specific character, which traits can exist directly in physical form, and which ones may need thoughtful adaptation.
The next step is therefore practical: what references should you provide so those defining features can actually be understood and recreated?
What References Do You Need to Recreate Your Character?
Good reference material does more than show what a character looks like. It helps define the details that cannot be guessed reliably once the character is converted from a flat image into a three-dimensional physical form.
You do not need to prepare a professional manufacturing file before contacting a customization team. The goal is simply to provide enough consistent visual information to explain the character's face, body, hairstyle, colors, proportions and signature features.
The best references depend on what you already have.
Best Case — A Full Character Sheet
If your character already has a character sheet or turnaround, this is usually the clearest starting point.
A useful character sheet may include front, side, three-quarter and back views. Each angle answers a different question. A front view shows facial width, eye placement and overall body proportions, while a side view helps define nose projection, chin position, forehead shape and head depth. Back views are especially useful for understanding hairstyle volume, clothing details and features that are invisible from the front.
Close-up references can then be added for details such as the eyes, makeup, facial markings, ears or hairstyle.
The references do not need to be beautifully formatted. Consistency is more important than presentation. If different images show different versions of the same character, clearly identify which one should be treated as the primary design.
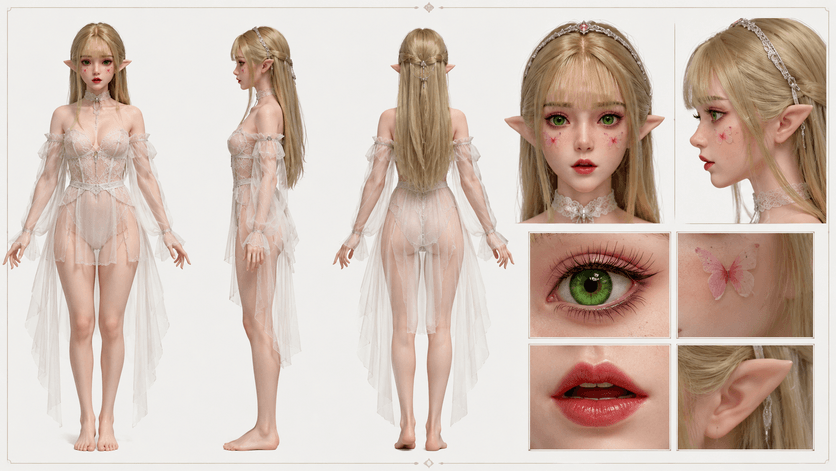
Multiple views help define the original character.
What If You Only Have One Image?
Having only one character image does not necessarily prevent a project from being evaluated. It simply means that anything outside the visible angle has to be clarified or interpreted.
For example, a front-facing illustration may clearly show the eye shape, bangs and facial markings, but it may not show the nose from the side, the back of the hairstyle, the exact body silhouette or details hidden behind clothing.
You can reduce this uncertainty by providing supplementary references that explain individual features. These references do not always have to show the same character.
For example, you could send:
- your main character image;
- a separate hairstyle reference;
- an eye-color reference;
- a body-shape reference;
- a makeup or skin-tone reference.
If one image should be treated as the definitive face reference, state that clearly. This is particularly useful when AI-generated images or multiple illustrations show small differences between the character's face or proportions.
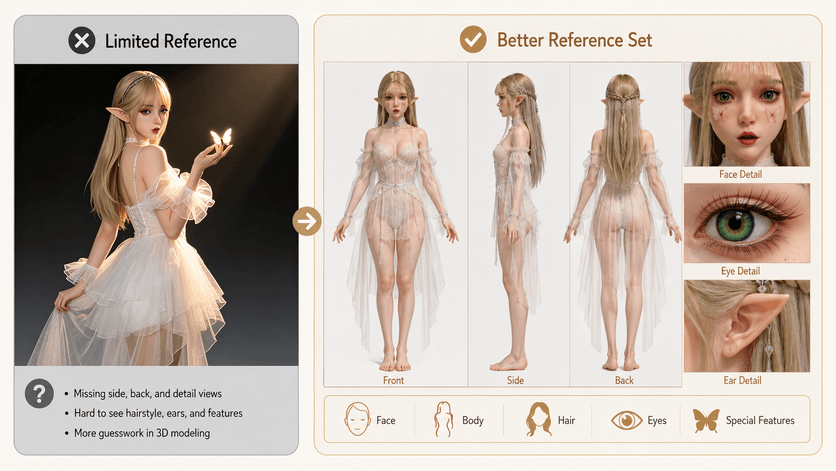
Better references support more accurate character recreation.
Useful Detail References
Once the main character appearance is clear, detail references help remove smaller ambiguities.
For the face, clear front and profile images are useful for understanding facial structure. For hair, show the color, length, fringe, parting and, if possible, the back of the hairstyle. For eyes, provide the intended color and general visual appearance.
Body references can help clarify height, overall silhouette and proportions when these are not obvious from the main artwork.
Fantasy or anime characters may also require separate references for pointed ears, unusual skin colors, facial markings, tattoos, horns or other recognizable features.
The purpose is not to provide hundreds of images. A small number of clear references that answer specific design questions is usually more useful than a large folder of inconsistent images.
What If You Already Have a 3D Model?
If your character already exists in Blender, ZBrush, VRoid, Maya or another 3D format, provide the available model file if possible, together with several clear renders.
Front, side and back renders help the team quickly understand the intended proportions and geometry even before the original file is reviewed.
It is also useful to explain the intended physical size or approximate height of the finished character. A digital model has no automatically defined real-world scale, so physical dimensions still need to be discussed.
An existing 3D model can reduce the amount of interpretation required, but it should still be treated as a design reference until its geometry, proportions and manufacturability have been evaluated.
What Makes the Finished Doll Actually Look Like Your Character?
When people judge whether a physical character “looks right,” they rarely compare every detail one by one. Recognition usually happens much faster. The shape of the face, hairstyle, eyes, body silhouette and a few distinctive features can make a character immediately recognizable—or make the finished result feel like a different person.
This is why not every detail should receive the same priority during a custom character project. A slightly different accessory color may have little effect on recognition, while changing the jawline, eye shape or hairstyle can completely change the character’s identity.
A useful way to think about the design is to separate features into three levels: must match, strongly preferred, and flexible. The features that define the character should receive the greatest attention during 3D modeling and design review.
Face Shape and Facial Proportions
For most human, anime-inspired and human-like fantasy characters, the face is one of the strongest sources of identity.
Small differences can matter. Eye spacing, face width, cheek shape, jawline, chin length, nose projection and lip position all affect how the face is perceived as a whole.
For example, a character may be known for a narrow lower face and slightly pointed chin. If the physical version has a wider jaw, the eyes and hairstyle may still be similar, but the character can immediately feel different.
The same is true for the side profile. A front-facing image does not fully explain the depth of the forehead, nose, lips or chin, which is why profile references are valuable when facial similarity is important.
The goal is not to measure one facial feature in isolation. It is to preserve the relationship between the features that creates the recognizable face.
Hairstyle and Character Silhouette
Hair is sometimes treated as a finishing detail, but for many anime, game and fantasy characters it is one of the strongest visual identifiers.
Think about how quickly a character can be recognized from a silhouette alone. Long silver hair, twin tails, a sharply shaped fringe, large side curls or an unusual layered hairstyle may define the character even before the face is visible.
Important hairstyle references should therefore show more than color. Length, bangs, parting, volume, curls, side pieces and the shape of the hair from behind can all affect the final appearance.
A hairstyle does not need to reproduce every illustrated strand. What matters more is preserving the overall shape that people associate with the character.
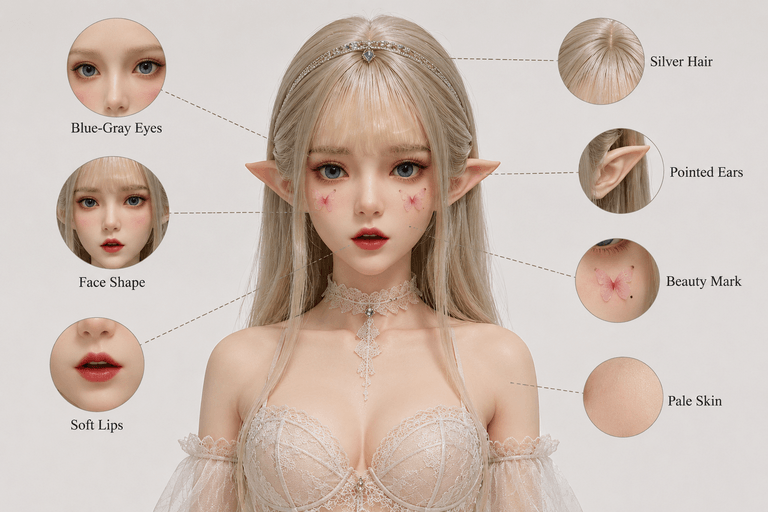
Key visual traits that define the character.
Eyes, Skin Tone and Makeup
Eyes can carry a disproportionate amount of character identity, particularly in anime and fantasy designs.
The important details may include eye shape, size, spacing, iris color and the overall expression created by the eyes. A character with pale blue-gray eyes may feel very different if the finished version uses a darker saturated blue, even when the rest of the face remains similar.
Skin tone also affects the character’s overall visual language. For a realistic human-style character, subtle differences between pale, warm, tan or cool skin tones can matter. For fantasy characters, skin color may be even more distinctive, such as very pale, blue, gray, purple or another intentionally non-human tone.
Makeup, freckles, beauty marks, facial markings and similar details can then reinforce the character rather than define the entire design by themselves.
Whenever possible, these colors should be shown with visual references rather than described only with words such as “light,” “dark,” or “warm.”
Body Proportions and Overall Silhouette
Character recognition does not stop at the face. When an original design becomes a full-size silicone doll, the body silhouette can be just as important as the facial features.
Height, shoulder width, torso length, waist-to-hip ratio, leg length and the overall head-to-body relationship can strongly influence whether the finished figure feels like the same character.
A tall, narrow fantasy character may lose part of its identity if converted into a shorter or much fuller silhouette. Likewise, an anime character designed around long legs and a compact torso may need those proportions considered even if some adaptation is required later.
The most useful question is not whether every measurement can be copied exactly. It is:
Which proportions make the character visually distinctive?
If the body shape is central to the design, it should be treated as one of the priority features rather than selected only after the face is completed.
Signature Character Features
Some characters are recognizable because of one or two details that almost function like a visual signature.
For an elf, this could be pointed ears. For a fantasy character, it might be unusual eye colors, horns, facial markings or a distinctive skin tone. For an anime or game character, it could be a beauty mark, tattoo, specific makeup pattern or recognizable hair accessory.
These features are especially important because removing them can make an otherwise accurate character feel generic.
Before 3D modeling is approved, it is therefore useful to ask one simple question:
If someone familiar with the character saw only the face, silhouette and three most distinctive features, would they still know who the character is?
If the answer is yes, the project has identified the right visual priorities.
The next challenge is different: even when those priorities are clear, a design that looks perfect in 2D or on a screen can change when it becomes a full-size three-dimensional object. That is what the next chapter examines.
What Happens When a 2D or 3D Character Becomes Full-Size?
A character that looks perfectly balanced in an illustration or digital render may feel surprisingly different when viewed as a full-size physical figure. This does not necessarily mean the design has been reproduced incorrectly. It often happens because a digital character is created for a screen, while a physical character must exist with real depth, real dimensions and real material behavior.
Features that appear elegant from one camera angle can become much more pronounced when viewed from the side. Extremely stylized proportions may also create a different visual impression once the character is scaled to human size.
Understanding these changes before production helps set more realistic expectations and makes it easier to decide which parts of the original design should be preserved exactly and which may need careful adaptation.
Why Anime Proportions Can Look Different in Real Life
Anime and stylized characters often use proportions that are intentionally different from realistic human anatomy.
Large eyes, tiny noses, narrow jaws, small waists, long legs and unusual head-to-body ratios may look completely natural in a drawing because the artist controls the viewing angle, perspective and visual style.
When those same proportions are translated into a three-dimensional physical character, the viewer can move around the figure and see it from angles that may never have existed in the original artwork.
For example, very large eyes may look attractive from the front but appear much more dominant when the face is viewed from three-quarter or side angles. A very narrow jaw may also create a sharper profile than expected when combined with realistic head depth.
This does not mean an anime character must automatically be made more realistic. It means the creator should decide how much of the original stylization should remain when the design becomes physical.
Some projects may preserve stronger anime geometry, while others may use a more human-like interpretation that still keeps the character’s recognizable eyes, hairstyle, face shape and overall silhouette.
Why a Character Can Look Good From the Front but Strange From the Side
A single front-facing image does not explain the full three-dimensional structure of a face.
It can show eye spacing, mouth width, facial outline and hairstyle placement, but it cannot fully define nose projection, forehead curvature, chin depth, jaw angle or the shape of the back of the head.
This is one reason 3D modeling becomes especially important when the original character was designed mainly from a front view.
A character can look extremely accurate when viewed directly from the front but still feel wrong from the side if those hidden dimensions were interpreted incorrectly.
Side and three-quarter views allow these proportions to be checked before the design moves into physical production.

Why Some Fantasy Features Need Structural Changes
Fantasy characters can introduce another challenge: some features are designed only to look visually impressive, not to behave like real physical structures.
Long pointed ears, thin horns, delicate fingers, floating accessories, extreme body extensions or very thin decorative elements may work perfectly in concept art because they do not have to support their own weight.
A physical character is different.
Projecting or very thin features may need additional support, modified thickness, separate components or a slightly simplified structure so they can exist reliably as part of the finished object.
The same issue applies to complicated fantasy hairstyles or accessories. A shape that appears to “float” around the character in a digital image may need a practical physical solution once it becomes full-size.
For this reason, fantasy features should be reviewed individually rather than assuming that every non-human detail can be copied in exactly the same way.
The goal is to preserve the visual idea of the feature without allowing a secondary structural problem to compromise the finished character.
Why Lighting Changes How the Character Looks
Even after the physical design is complete, the same character can look different depending on how it is viewed and photographed.
A 2D illustration may use soft painted shadows and idealized highlights. A 3D render may use controlled studio lighting. Factory photographs may be taken under bright overhead lights, while the finished character may later be viewed under warmer indoor light or natural daylight.
These lighting changes can affect how skin tone, facial depth, eye color and surface texture are perceived.
For example, a pale fantasy skin tone may appear cooler under white factory lighting but slightly warmer under household lighting. Shadows around the nose, jaw or eyes can also make facial proportions appear stronger or softer.
This is why comparing a physical silicone character directly with a digital render should take lighting and viewing conditions into account.
The most useful expectation is not that the character will look identical in every photo, render and lighting condition. It is that the underlying design, proportions and identity-defining features remain consistent across those different viewing conditions.
Before judging similarity, it is therefore better to compare the character from several angles and under reasonably consistent lighting rather than relying on a single photograph.
Once these 2D-to-3D differences are understood, the next question becomes much easier to follow: how does the approved character design actually move from artwork and 3D modeling into silicone production?
How Does Your Character Go From Artwork to Silicone?
Once the character references, proportions and priority features are clear, the project can move from visual planning into production. The process is not a single jump from artwork to silicone. It passes through several checkpoints, beginning with 3D modeling and ending with finishing, assembly and inspection.
The most important principle is simple: major visual decisions should be resolved before mold making begins. Changes to the face, proportions or structural features are far easier to make while the character still exists as a digital model than after physical production has started.
Step 1 — Character Reference Review and 3D Modeling
The approved references become the foundation for a custom three-dimensional model.
For the face, the 3D artist uses the available front, side and three-quarter views to establish facial width, eye position, nose projection, chin shape, forehead depth and other important proportions. For stylized characters, the model also needs to preserve the visual features identified earlier as essential to the character.
The first 3D version should be treated as a working model rather than an automatic final result. Its purpose is to turn the character from a collection of images into something that can be viewed and evaluated from multiple angles.
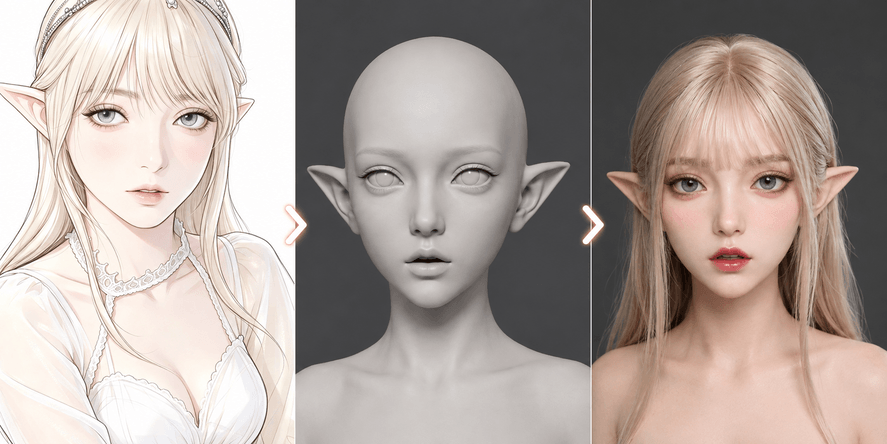
Original character recreated as a detailed 3D model.
Step 2 — Review and Refine the 3D Model
Before physical production begins, the 3D model should be compared with the approved character references.
This is the stage to check whether the face still feels like the intended character from the front, side and three-quarter views. Differences in eye position, jaw width, facial depth or other defining features can be identified and adjusted here.
Stylized characters deserve particular attention. A combination that looks natural in a 2D illustration—such as large eyes and a very narrow jaw—may create a different impression once the face has real depth.
If a correction is needed, this is the right time to make it. Once the design moves into physical mold preparation, major structural changes become much more difficult.
Step 3 — Approve the Design and Prepare the Mold
After the digital design is approved, the project begins moving out of the virtual environment.
The approved 3D data is used to prepare the physical form required for mold production. At this point, dimensions and surface geometry need to follow the confirmed design because the mold establishes the basic geometry that will later be reproduced in silicone.
For the customer, this is an important boundary in the project:
before mold preparation, the character is still primarily a design; after this point, the approved design begins becoming a manufactured object.
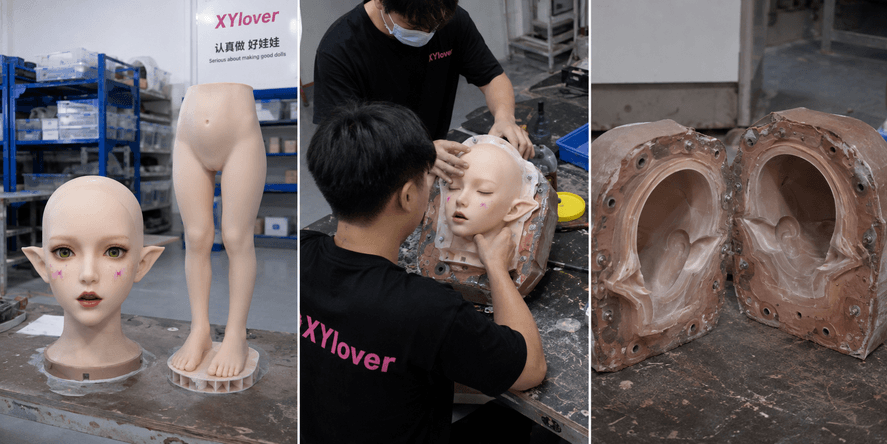
Approved character model enters physical production.
Step 4 — Produce the Silicone Body and Components
Once the molds are ready, the character can enter silicone production.
The silicone is processed with the prepared mold to form the required body or components. Depending on the product design, an internal structure may also be incorporated to provide the intended support and positioning capability.
This is the stage where digital proportions become real physical dimensions. Height, body shape and facial geometry are no longer only numbers or shapes on a screen.
After curing and demolding, the silicone components can be inspected before they move into finishing and assembly.
If you want to understand how the two common doll materials differ in feel, surface characteristics, and everyday use, see our TPE vs. silicone comparison.
Step 5 — Add Skin Color and Character Details
A newly produced silicone form still does not fully look like the finished character.
Coloring and surface finishing establish the intended skin tone and visible character details. Depending on the design, these details may include makeup, lip color, eyebrows, freckles, beauty marks, veins or fantasy-specific markings.
This stage is especially important for characters whose identity depends heavily on color. Pale fantasy skin, unusual makeup or distinctive facial markings can contribute strongly to recognition.
The objective is not simply to apply one flat color. The finishing stage helps bring the physical silicone surface closer to the approved visual design.
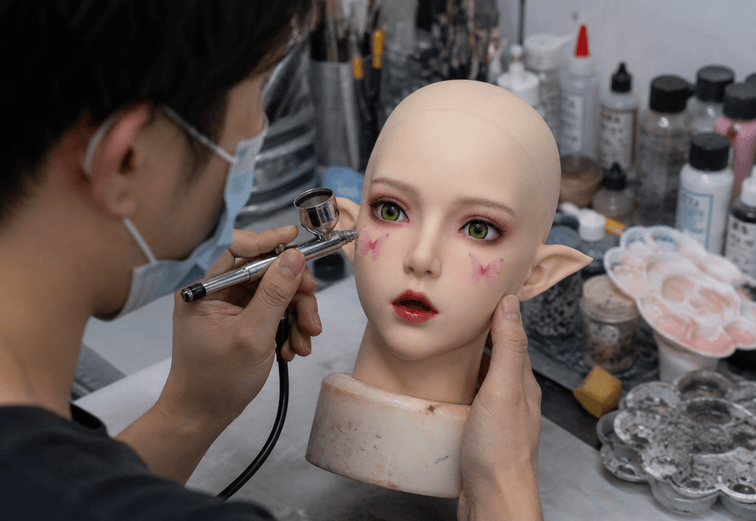
Character details recreated through hand coloring.
Step 6 — Add Hair, Eyes and Other Recognizable Features
Hair and eyes can substantially change how the finished character is perceived.
The hairstyle should follow the confirmed direction for color, length, fringe, parting, curls and overall silhouette.
Eye color and appearance are also matched to the confirmed design, together with any remaining character-specific details.
For characters with highly recognizable hair or eyes, these finishing elements can be almost as important to visual identity as the underlying 3D facial model.
Step 7 — Assembly and Final Inspection
After the silicone components and visible details are completed, the character moves into final assembly and inspection.
The finished appearance should be compared with the approved design and reference materials. The production team can review the coloring, hair, eyes, visible surface details and the assembly of the major components.
For an original character project, the final result should not be judged only as a generic production doll. The more useful comparison is against the character references and the approved 3D direction established earlier in the project.
At this point, the process has moved through:
Character References → 3D Model → Review → Approval → Mold → Silicone Production → Finishing → Assembly
The next question is the one most customers care about after understanding this process: how close can the finished silicone doll actually look to the original character?
How Close Can the Finished Silicone Doll Look to Your Original Character?
The finished silicone character can often preserve many of the visual features that make an original design recognizable, but similarity should not be judged by asking whether every pixel of a digital image has been copied exactly.
A better question is whether the physical character preserves the same visual identity.
That identity may come from the shape of the face, eye appearance, hairstyle, skin tone, body silhouette, pointed ears, markings or other signature features. When those high-priority elements remain consistent, the finished character can still feel strongly connected to the original design even if a secondary detail needs to be adapted for physical production.
For this reason, the most realistic goal is high visual similarity within practical manufacturing constraints, rather than mathematically exact reproduction.
What Usually Improves Character Similarity?
The quality of the result begins with the quality of the information available before production.
Multiple consistent references are particularly valuable. Front, side and three-quarter views help explain facial geometry that cannot be understood from one image alone. Clear hairstyle, eye, skin-tone and body references reduce the number of details that need to be interpreted.
Another major factor is deciding which features deserve the highest priority.
If the character is defined by a narrow jaw, silver hair, pale blue eyes and pointed ears, those features should receive more attention than a minor accessory color or a small decorative detail.
The 3D review stage is also important because it provides an opportunity to compare the character from several angles before the design becomes physical. Differences in face width, profile, eye placement or body proportions can be corrected much more easily at this stage than after mold production has begun.
In other words, similarity is not created only during the final painting stage. It is built gradually through references → priorities → 3D modeling → review → finishing.
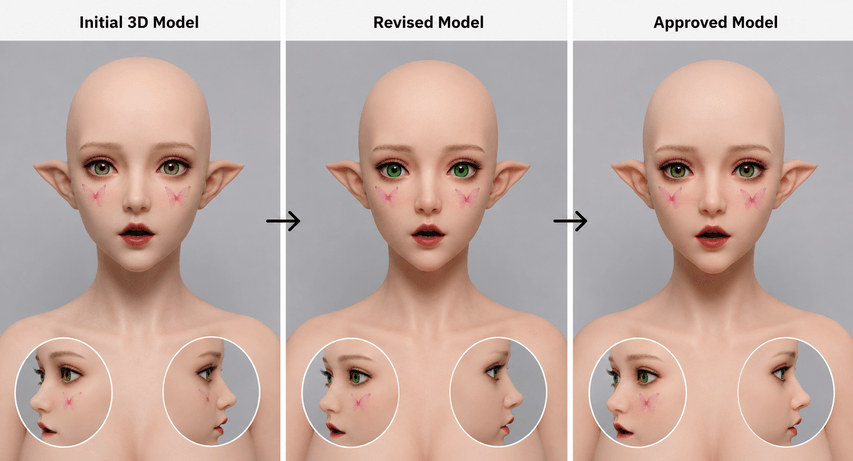
Refining the character before final approval.
What Can Prevent Exact Reproduction?
The greatest limitations usually appear when a digital design depends on features that do not have a straightforward physical equivalent.
Illustrations and 3D renders can use extremely thin structures, exaggerated anatomy, impossible proportions or decorative elements that appear to float without support. A physical silicone character must account for real dimensions, material behavior, mold construction, internal support and assembly.
This becomes particularly relevant for:
- very large anime eyes combined with extremely narrow facial geometry;
- unusually thin fingers or limbs;
- very long projecting elf ears;
- large horns or unsupported structures;
- extreme body proportions;
- highly complex fantasy hairstyles;
- floating or very delicate accessories.
Some of these features may only need minor adaptation. Others may need a different physical solution, separate component or simplified interpretation.
This does not automatically reduce character recognition. The important distinction is whether the modified feature is central to the character's identity or only a secondary design element.
What Does “1:1” Really Mean?
The phrase 1:1 custom character can easily be misunderstood.
In this context, 1:1 usually refers to physical scale or intended life-size dimensions, not a promise that every line, pixel and proportion in a 2D illustration will be reproduced with mathematical exactness.
For example, a character may be designed as a 165 cm life-size silicone figure while preserving its recognizable face, hairstyle, eye color and body silhouette. That does not necessarily mean an exaggerated anime head-to-body ratio or every digital accessory must be reproduced without adjustment.
The same distinction applies to a 1:1 anime character silicone body. The physical figure can follow the intended height and character proportions as closely as practical, while still requiring three-dimensional interpretation where the original artwork does not provide physically complete information.
A useful way to define the target before modeling is therefore:
physical scale + priority visual features + acceptable adaptations
rather than using “1:1” alone.
Example — Original Character → 3D Model → Finished Silicone Character
The best way to evaluate a custom character project is not to look only at a finished doll photograph.
A more useful comparison follows the project through several checkpoints:
Original Reference → 3D Reconstruction → Approved Model → Physical Production → Finished Silicone Character
At the final stage, compare the result with the features identified as priorities at the beginning.
Does the face preserve the intended overall structure?
Does the hairstyle maintain the recognizable silhouette?
Are the eye color and skin tone consistent with the approved direction?
Are important fantasy or anime features still recognizable after physical adaptation?
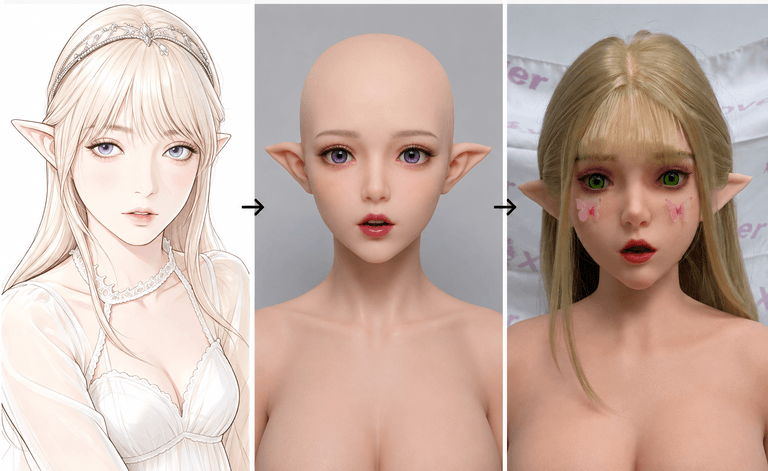
From original design to finished silicone character.
This comparison is more informative than asking whether the result is “100% identical.” It shows whether the character's core visual identity survived the entire transition from artwork to a real physical form.
The final step is therefore not another manufacturing question. It is deciding whether your own character references are clear enough to begin a custom project—and what you actually need to prepare before requesting an evaluation.

Recent Posts


Product Categories