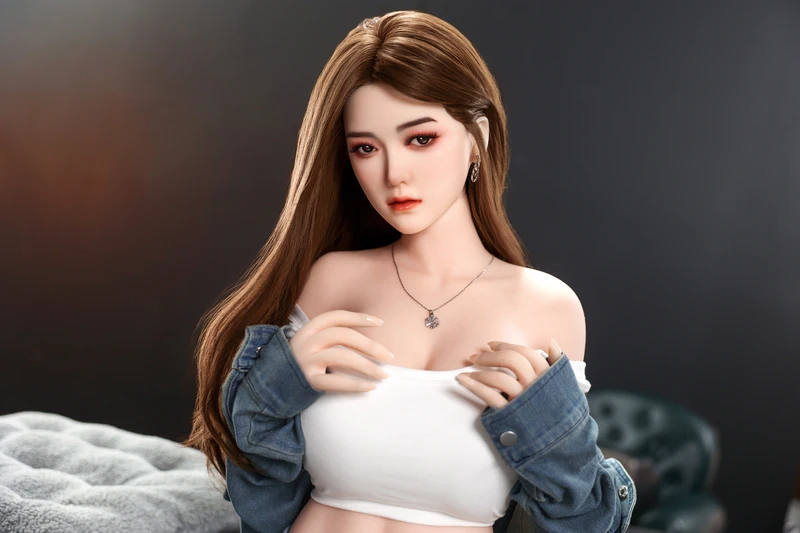
An original character silicone doll can turn a character that exists only in concept art, AI-generated images, digital illustrations, or a 3D model into a real physical silicone figure. Through custom 3D modeling and silicone manufacturing, the character’s face, body proportions, skin tone, hairstyle, eyes, and other recognizable features can be developed for physical production.
However, turning a digital character into silicone involves more than simply copying an image. The design must be interpreted in three dimensions, reviewed for manufacturing feasibility, and adapted where necessary while preserving the character’s core visual identity.
This guide explains the complete process from original character to real silicone doll—including what reference materials to prepare, how 3D modeling works, what can be customized, how silicone production is completed, and what to expect from the final result.
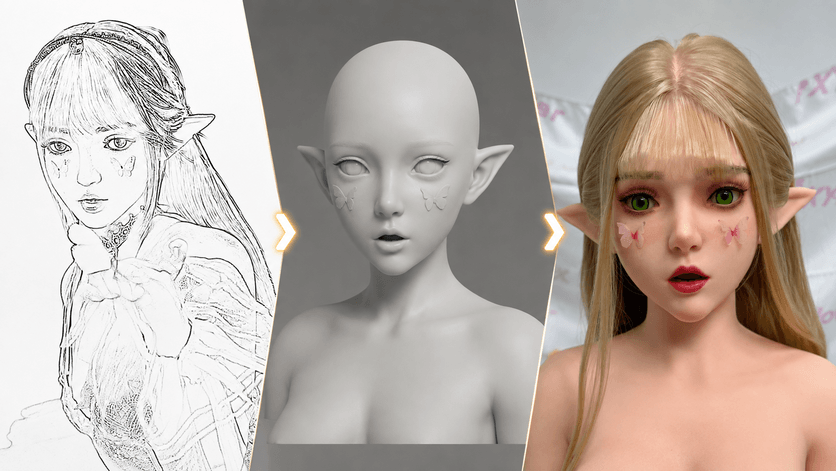
From character design to physical silicone clone doll.
What Is an Original Character Silicone Doll?
An original character silicone doll is a physical silicone character developed from a design created or supplied by the customer rather than selected directly from an existing production model.
The starting point can vary considerably. Some projects begin with detailed concept art showing the character from several angles. Others may begin with AI-generated character images, anime artwork, digital illustrations, Blender or ZBrush models, or even a collection of sketches and visual references.
What makes this type of project different is the amount of design interpretation required before manufacturing begins.
From an Original Idea to a Physical Character
A digital character is designed primarily for visual presentation. A physical silicone character, however, must exist in three-dimensional space and work within real manufacturing constraints.
For example, a concept artist can create extremely narrow waists, unusually long limbs, oversized eyes, fantasy ears, or facial structures that would be difficult to reproduce exactly using conventional silicone manufacturing methods. These features therefore need to be evaluated during the 3D modeling stage.
The goal is not simply to reproduce every pixel of the original artwork. Instead, the objective is to identify the character's most recognizable features and translate them into a manufacturable three-dimensional form while preserving its visual identity as closely as practical.
For a human-style character, this may involve matching the shape of the face, nose, lips, jawline, body proportions, hairstyle, and skin tone. For anime or fantasy characters, distinctive eyes, unusual colors, ears, makeup, or other signature features may become more important.
This is why the quality and consistency of the original reference materials have a direct impact on the development process.
Original Character vs. Standard Silicone Doll
A standard silicone doll normally begins with an existing face, body, and mold that have already been developed for production. Customers may still be able to choose options such as skin tone, eye color, hairstyle, makeup, or other details, but the fundamental physical design already exists.
An original character project starts much earlier in the development process.
Instead of choosing only from existing designs, the face and other important characteristics may need to be reconstructed through 3D modeling based on the supplied character references. The model must then be reviewed before moving into mold preparation and silicone production.
This additional development stage makes original character projects more suitable for customers who want to create a physical version of a specific OC, anime-inspired character, fantasy character, game-style character, or another individually designed figure.
It also means that the feasibility of a project cannot be determined solely from a single attractive reference image. The design needs to be evaluated in terms of available references, proportions, physical structure, silicone manufacturing, and the level of customization required.
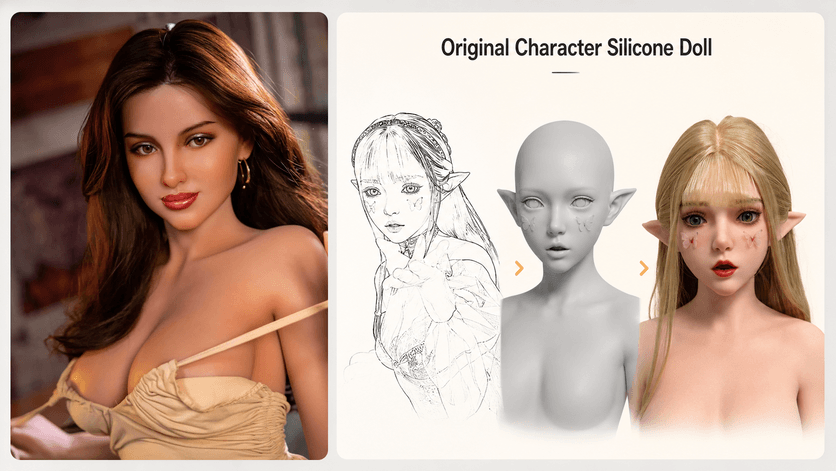
Existing design compared with a custom character creation.
The distinction is therefore straightforward: a standard doll begins with an existing physical design, while an original character silicone doll begins with the character itself.
The next step is determining what kind of character material can actually be used as the starting point—and you may already have more useful reference material than you think.
What Can You Use to Create Your Character?
You do not necessarily need a professional 3D model before starting an original character silicone doll project. Depending on the character and the required level of accuracy, the development process can begin with concept art, AI-generated images, digital illustrations, or an existing 3D model.
The most important factor is not the software used to create the character. It is whether the references clearly and consistently communicate the character’s appearance, proportions, and distinctive features.
Concept Art and Character Illustrations
Concept art is one of the most useful starting points, especially when the character has already been designed from multiple angles.
A front view provides information about facial proportions, body width, eye shape, hairstyle, and clothing or accessory placement. Side and back views help the 3D artist understand features that cannot be accurately interpreted from the front alone, such as nose projection, jaw shape, head depth, hairstyle volume, and body contours.
If available, close-up references of the face, eyes, makeup, hairstyle, hands, or other distinctive details can further reduce ambiguity during modeling.
For example, if your character has silver hair, blue-gray eyes, pointed ears, and a distinctive facial marking, provide clear references for each of these features rather than relying on a single full-body illustration.
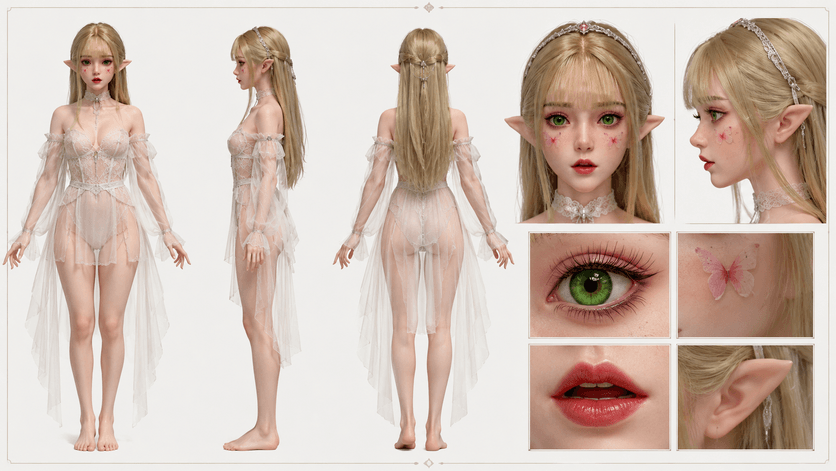
Multiple views help define the original character.
AI-Generated Character Images
AI-generated artwork can also be used as a starting reference, particularly when you have a character concept but no traditional concept sheet.
However, AI images should be checked carefully before they are submitted for modeling. Different generated images may unintentionally change the character’s facial structure, hairstyle, body proportions, clothing details, or other features.
If several AI images are provided, they should represent the same character as consistently as possible.
For example, if one image shows a narrow face and another shows a noticeably wider jaw, the 3D artist needs to know which version should be treated as the primary reference. Selecting one main image and using the remaining images only as supplementary references can make the modeling process more efficient.
Existing 3D Models
If you already have a 3D character model created in software such as Blender, ZBrush, Maya, or another 3D application, it can provide a much clearer three-dimensional reference than a single 2D image.
However, a digital model created for animation, rendering, or games is not automatically ready for physical silicone production.
The model still needs to be evaluated for physical dimensions, proportions, surface details, mold feasibility, internal structure, and other manufacturing requirements. Certain parts may need to be adjusted before the design can move into production.
Therefore, an existing 3D model can significantly improve communication and reduce interpretation, but it should still be treated as a design reference until its manufacturability has been reviewed.
What If You Only Have One Image?
A single image may still be enough to begin an initial evaluation, but it usually leaves more details open to interpretation.
Features that are hidden or unclear—such as the side profile, back of the hairstyle, exact body proportions, or details on the opposite side of the character—may need to be confirmed separately.
For better accuracy, provide additional references whenever possible. These do not always need to be drawings of the exact character. Reference images can also be used to explain individual details.
For example, you might provide your main character illustration together with a separate hairstyle reference, eye-color reference, body-proportion reference, and makeup reference.
The clearer the visual information is before modeling begins, the fewer assumptions need to be made during the conversion from a 2D character into a three-dimensional silicone form.
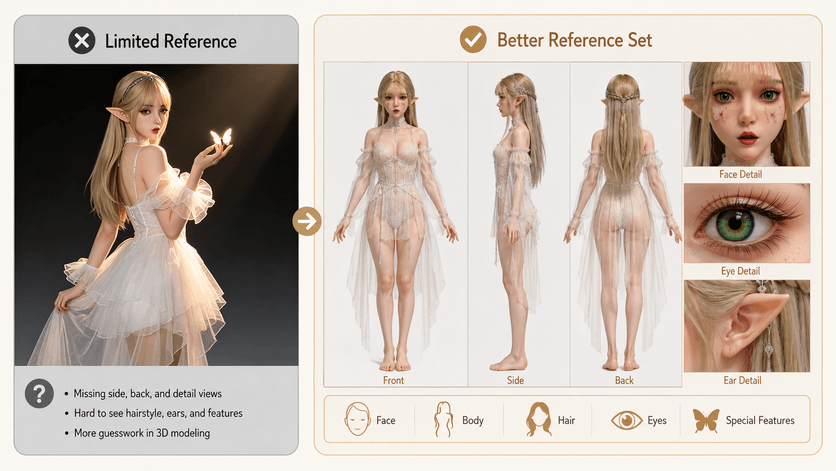
Better references support more accurate character recreation.
Once the reference materials are collected, the next stage is deciding which features define the character and which details may need to be adapted for real-world production.
Deciding What the Final Silicone Character Should Look Like
Before 3D modeling begins, the character references need to be translated into a clear customization plan. This is where you decide which features must closely follow the original design and which details can be adapted to make the character practical for physical silicone production.
For highly stylized characters, an exact one-to-one translation is not always possible. The objective is to preserve the character’s recognizable identity while creating proportions, structures, and details that can realistically exist as a physical silicone figure.
Identify the Character’s Most Important Features
Not every visual detail contributes equally to a character’s identity. Some features are much more important than others and should be prioritized during customization.
For most human or human-like characters, these usually include the facial structure, eye shape and color, hairstyle, skin tone, body proportions, and distinctive visual details.
For example, imagine an original fantasy character with silver-gray hair, blue-gray eyes, pale skin, slightly pointed ears, and a small beauty mark beneath one eye. Changing the exact shade of the clothing may have relatively little impact on recognition, while changing the eye shape, hairstyle, or facial proportions could make the finished figure look like a different character.
Before modeling begins, it is therefore useful to identify the features that are essential to the character and clearly communicate them to the customization team.
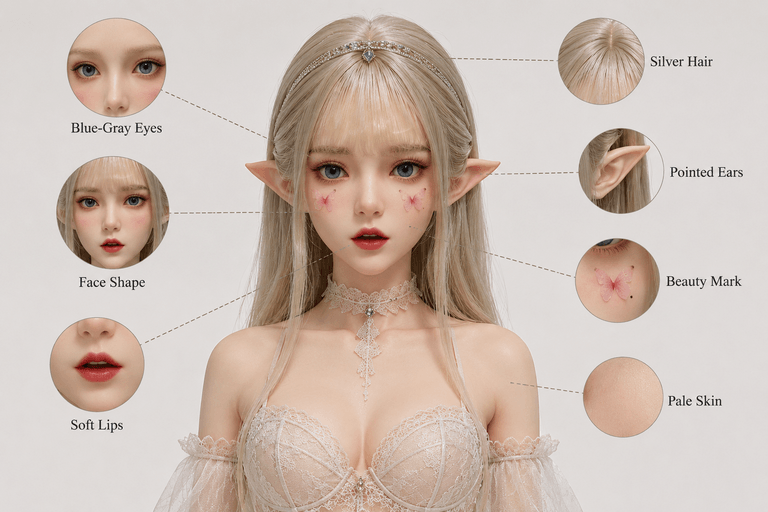
Key visual traits that define the character.
Decide on Face, Body, Skin, Hair, and Eyes
Once the key characteristics have been identified, they can be translated into specific customization decisions.
The face usually requires the closest attention because relatively small changes to the eyes, nose, lips, jawline, or facial proportions can significantly affect the character’s overall appearance.
The body needs similar consideration. If the original artwork uses realistic human proportions, the transition may be relatively straightforward. If the character has exaggerated proportions, the design may need to be adjusted while retaining the intended silhouette.
Skin tone should be defined using clear visual references rather than broad descriptions whenever possible. Terms such as “pale,” “tan,” or “warm” can be interpreted differently, while a consistent visual reference gives the production team a clearer target.
Hair also plays an important role in character recognition. Customers should provide references for color, length, fringe or bangs, parting, curls, and overall hairstyle. Complex hairstyles may require a combination of wig styling or implanted hair depending on the design and production plan.
For the eyes, references can help define color, iris appearance, and the general visual effect required for the character.
Additional details such as makeup, freckles, beauty marks, tattoos, fantasy ears, or other recognizable features should also be discussed before production.
What May Need to Be Adjusted for Real-World Production?
Some character designs are created without physical manufacturing constraints. Features that look convincing in an illustration or digital render may behave very differently when translated into a full-size silicone object.
Extremely thin areas, exaggerated limbs, unusually large or projecting features, highly complex hairstyles, or unsupported decorative elements may require modification for structural or manufacturing reasons.
The same principle applies to proportions. An anime-style character, for example, may have a head-to-body ratio or facial geometry that works well in an illustration but needs some adaptation when converted into a three-dimensional human-scale figure.
These adjustments do not necessarily mean abandoning the original design. Instead, the goal is to find a workable balance between visual fidelity and physical feasibility.
When a feature cannot be reproduced exactly as shown in the artwork, it should be discussed during the design and modeling stage rather than discovered after the mold or silicone body has already been produced.
Confirm the Design Before Production
This planning stage creates a clearer specification for the 3D modeling team.
Before moving forward, the customer and customization team should have a shared understanding of the target face, body proportions, skin tone, hairstyle, eye color, and any special character features.
This does not mean that every manufacturing detail must already be finalized. Instead, the purpose is to remove major visual ambiguities before detailed 3D modeling begins.
Once these decisions are confirmed, the character can move from a collection of reference images into a three-dimensional model that can be reviewed, adjusted, and eventually prepared for physical production.
From 3D Model to Physical Silicone Character
Once the character references and customization requirements are confirmed, the project moves into its most important stage: turning the digital design into a physical silicone character. This process usually involves 3D modeling, model review, physical model preparation, mold making, silicone production, coloring, hair and eye installation, assembly, and final inspection.
Each stage builds on the previous one. For this reason, major changes to the character should ideally be completed during 3D modeling, before the project enters mold and silicone production.
Step 1: Build the Character in 3D
The first step is to convert the supplied character references into a three-dimensional model.
The 3D artist uses the approved images, illustrations, or existing digital model to establish the character’s facial structure and other important physical characteristics. For a custom face, particular attention is usually given to the eyes, nose, lips, cheeks, jawline, forehead, and overall head proportions.
Multiple reference views are especially useful at this stage. A front image can show facial width and feature placement, while side and three-quarter views provide information about nose projection, chin position, forehead shape, and overall facial depth.
The initial model is not necessarily the final version. It provides a three-dimensional foundation that can be reviewed and refined before physical production begins.
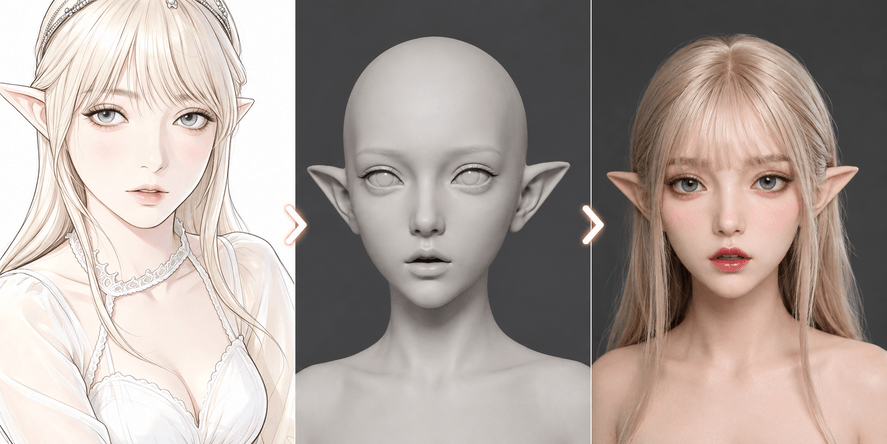
Original character recreated as a detailed 3D model.
Step 2: Review and Refine the 3D Model
Before the design moves into physical production, the 3D model should be reviewed against the original character references.
This is the stage where differences in facial proportions, profile, eye position, jaw shape, or other defining features can be identified and corrected. For stylized characters, it is also the point where the team can evaluate whether exaggerated digital features work convincingly in three dimensions.
For example, if the original character has a very narrow jaw and large eyes, the first 3D version may reveal that the combination looks significantly different when viewed from the side. The model can then be adjusted while keeping the character’s intended visual identity.
Several rounds of refinement may be required depending on the complexity of the project and the quality of the original references.
Changes are much easier to make at this stage than after a physical mold has been produced, which is why model confirmation is an important production checkpoint.
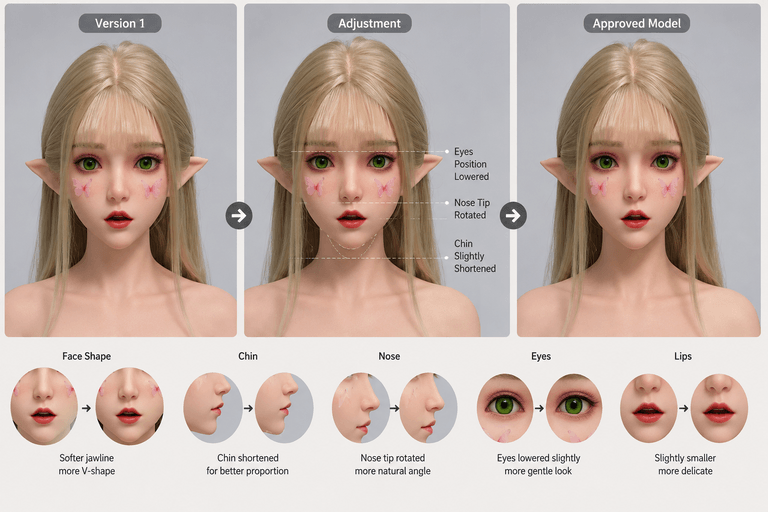
Refining the 3D model before production.
Step 3: Prepare the Physical Model and Mold
After the digital design is approved, the project can move from the virtual environment into physical manufacturing.
Depending on the production method, the approved 3D data is used to prepare the physical form required for mold production. At this point, dimensions and surface geometry need to correspond with the confirmed design because the mold will define the basic shape of the silicone component.
The mold-making stage is critical. It establishes the physical geometry that will later be reproduced in silicone, so errors introduced here can affect the final result.
For an original character project, this stage is where the approved digital character begins to become a real manufactured object rather than a computer model.
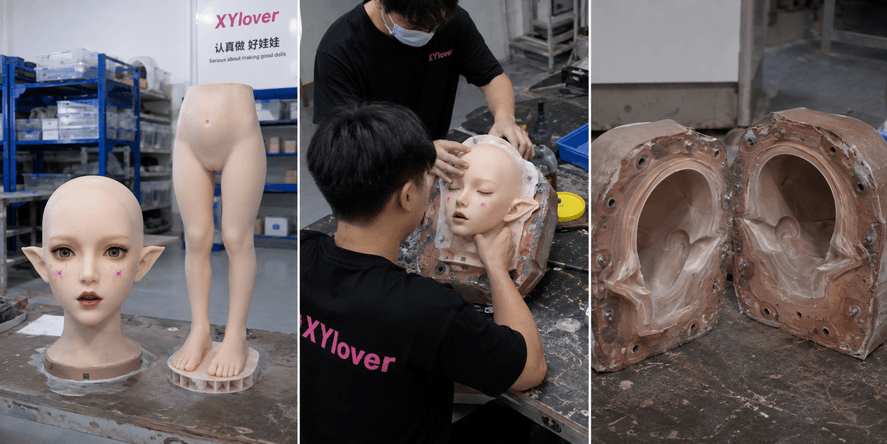
Approved character model enters physical production.
Step 4: Produce the Silicone Body and Components
Once the molds are ready, the character can enter silicone production.
Silicone is prepared and processed according to the required manufacturing method, then used with the mold to form the character’s physical body or individual components. An internal structure may also be incorporated according to the product design so that the finished figure has the intended support and positioning capability.
At this stage, the character’s digital proportions become physical dimensions. This is why decisions made earlier about height, body shape, facial geometry, and other structural characteristics need to be confirmed before production.
After curing and demolding, the silicone components are inspected and prepared for subsequent finishing and assembly.
Step 5: Add Skin Color and Character Details
A newly produced silicone form still needs finishing before it visually resembles the original character.
Coloring is used to establish the overall skin tone and add more subtle surface variation. Depending on the design, additional details may include facial makeup, lip color, eyebrow appearance, freckles, beauty marks, veins, or other character-specific features.
For fantasy or stylized characters, this stage can be particularly important. An unusual skin tone, distinctive makeup pattern, facial marking, or other visual feature may contribute strongly to character recognition.
The goal is not simply to apply a flat color. Careful finishing helps give the silicone surface greater visual depth and brings the physical figure closer to the approved character design.
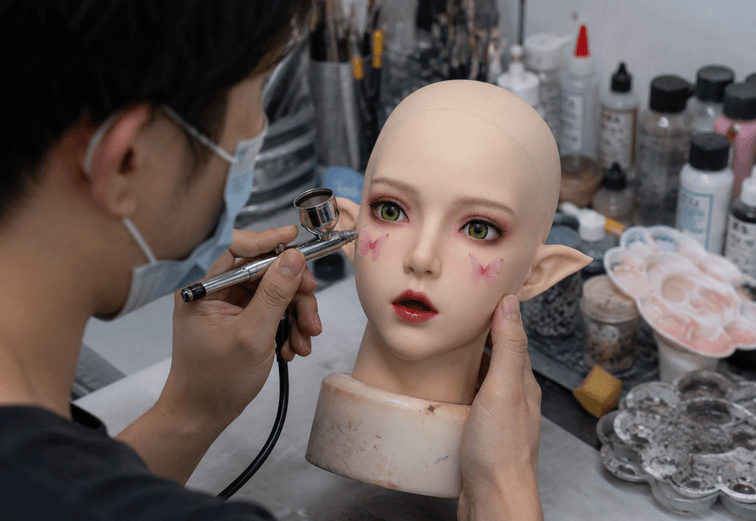
Character details recreated through hand coloring.
Step 6: Install Hair, Eyes, and Other Character Features
Hair and eyes can dramatically change how closely the finished silicone figure resembles the original character.
The hairstyle should follow the approved references as closely as practical, including color, length, fringe, parting, curls, and overall silhouette. Depending on the project, the production method may involve a styled wig, implanted hair, or another suitable solution.
Eye color and appearance should also follow the confirmed design. Additional character details can be completed during this stage according to the project specification.
For a character with highly recognizable visual features—such as silver hair, blue-gray eyes, or a distinctive hairstyle—these finishing elements can be just as important to recognition as the underlying facial model.
Step 7: Assembly and Final Inspection
After the major silicone components and visual details are completed, the character moves into final assembly and inspection.
The production team checks whether the finished appearance is consistent with the approved design and whether the major components have been assembled correctly. Visible surface details, hair, eyes, coloring, and other customized features can also be reviewed before completion.
For a highly customized original character, the final inspection should be compared with the approved references rather than evaluated only as a standard production model.
At this point, the journey from artwork to physical object is complete: the original concept has passed through digital reconstruction, manufacturing, silicone finishing, and assembly to become a real three-dimensional character.
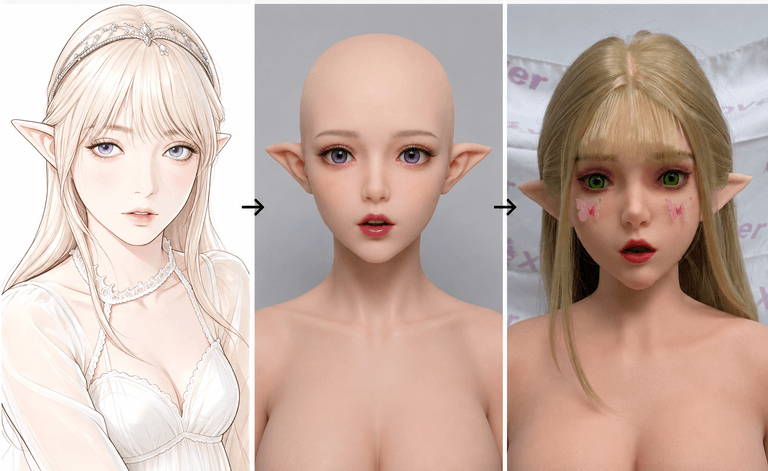
From original design to finished silicone character.
The manufacturing process explains how the character is physically created, but it also reveals an important limitation: not every digital design can be reproduced exactly as it appears on screen. Understanding where those limitations occur can help set more realistic expectations before starting a custom project.
What Can and Cannot Be Reproduced Exactly?
Turning an original character into a physical silicone doll involves translating a digital design into a real three-dimensional object. While many visual characteristics can be closely customized, the final result should not automatically be expected to reproduce every detail of the artwork with absolute one-to-one accuracy.
Understanding these limitations before production helps establish realistic expectations and makes it easier to decide which character features should receive the highest priority.
Features That Can Usually Be Closely Customized
Many of the features that define a character’s overall appearance can be recreated or customized based on clear visual references.
These may include the general facial structure, face shape, eye appearance, skin tone, hairstyle, hair color, body proportions, makeup, beauty marks, freckles, and other visible character details.
Accuracy depends heavily on the quality of the references. If the same character is shown clearly from the front, side, and three-quarter views, the 3D artist has substantially more information than when working from a single image.
Distinctive features should also be identified early. If a character is recognizable because of a particular eye shape, narrow jaw, unusual hairstyle, pointed ears, or facial marking, these elements should be treated as priorities throughout modeling and production.
Why a Physical Silicone Character May Look Slightly Different
A digital character exists without many of the constraints that apply to physical manufacturing.
Illustrators can exaggerate anatomy, create extremely thin features, use impossible proportions, or design elements that appear to float without structural support. A physical silicone figure must account for actual dimensions, material behavior, internal support, mold construction, assembly, and durability.
For example, extremely thin fingers or projecting fantasy features may need structural adjustments. Similarly, a highly stylized anime face with very large eyes, a tiny nose, and an extremely narrow jaw may need careful interpretation when translated into a full three-dimensional form.
Lighting also affects perception. A character may look different between a 2D illustration, a 3D render, a factory photograph, and the physical figure viewed under natural light even when the underlying design is similar.
For these reasons, the objective should be high visual similarity within practical manufacturing constraints, rather than an assumption of mathematically exact reproduction.
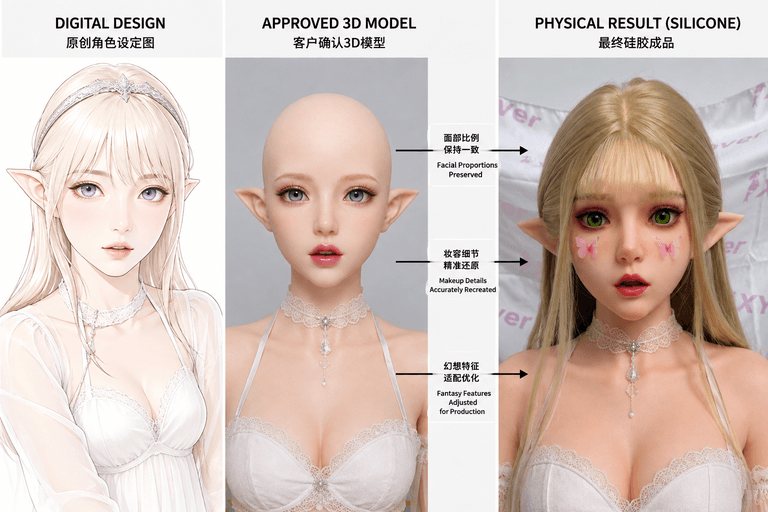
Adapting a digital character into a physical silicone form.
Stylized and Fantasy Features Need Individual Evaluation
The more stylized the character is, the more important feasibility evaluation becomes.
Anime-inspired facial proportions, fantasy ears, unusual skin colors, exaggerated body shapes, complex hairstyles, horns, decorative structures, or other non-human characteristics cannot all be treated in exactly the same way.
Some features may be reproduced directly in silicone. Others may require modifications, alternative materials, separate components, or a simplified interpretation. Certain designs may not be practical to manufacture at all in their original form.
This is why unusual features should be reviewed individually before the final design is approved.
Instead of assuming that every element shown in the concept art can be copied exactly, customers should identify which features are essential to the character’s identity and which ones can accept reasonable adaptation.
Set Priorities Before the 3D Model Is Approved
A useful way to manage expectations is to divide the character’s features into priorities.
The first priority should include the elements that determine whether the finished figure is immediately recognizable as the intended character—typically the face, hairstyle, eyes, skin tone, body silhouette, and signature features.
Secondary details can include smaller cosmetic elements or decorative characteristics that do not significantly change the character’s identity.
These priorities should be discussed before the 3D model is approved. Once mold making and silicone production begin, major structural changes become significantly more difficult than adjustments made during the digital modeling stage.
The most successful projects therefore do not depend on trying to reproduce every detail without compromise. They depend on clear references, realistic manufacturing expectations, and agreement on which visual characteristics matter most.
With those expectations established, the next question is practical: what information should you prepare before requesting a custom original character silicone doll?
A Real Original Character-to-Silicone Doll Project
The complete process is easier to understand through a real project. Instead of looking at 3D modeling, mold making, coloring, and assembly as separate production steps, a case study shows how the original character is gradually translated from a digital concept into a physical silicone figure.
The following structure can be used to document an actual XYlover project while protecting any private customer information. The focus should remain on the character references, design decisions, production process, and final result.
The Starting Character Design
The project begins with the customer’s original character references.
These references establish the character’s overall visual identity, including facial appearance, hairstyle, eye color, skin tone, body proportions, and any distinctive features. Before modeling begins, the references are reviewed to determine which characteristics can be reproduced directly and which may require further clarification or physical adaptation.
For example, if the character has a distinctive face, unusual hairstyle, specific eye color, and recognizable body silhouette, these features can be identified as the main priorities for the project.
The customer does not necessarily need to provide manufacturing-ready drawings. The purpose of the initial references is to give the 3D modeling team enough consistent visual information to understand what the finished character should look like.
Turning the Character Into an Approved 3D Model
The next stage is reconstructing the character in three dimensions.
The initial model establishes the basic facial geometry and other important physical characteristics. It is then compared with the original references to identify differences in areas such as face width, jawline, nose projection, lips, eye position, or overall proportions.
This comparison-and-adjustment process is important because a character that appears correct from the front may look noticeably different when viewed from the side or at a three-quarter angle.
Instead of immediately moving the first model into production, revisions can be made until the major character-defining features are sufficiently represented in three dimensions.
Once the design is confirmed, the approved 3D model becomes the basis for the subsequent physical production stages.
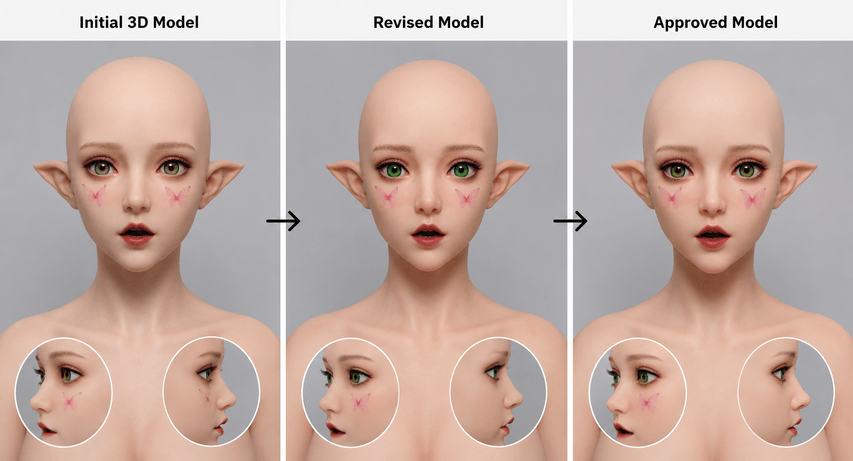
Refining the character before final approval.
From the Approved Model to Silicone Production
After the 3D design is approved, the project moves into manufacturing.
The confirmed geometry is used to prepare the physical model and mold required for silicone production. Once the mold is completed, the corresponding silicone components can be produced and prepared for finishing.
This stage is where the character stops being purely digital. Dimensions, contours, and facial geometry that previously existed only on a screen now become physical shapes.
After demolding, the silicone form still does not represent the finished character. Skin coloring, facial details, eyes, hair, and other customized elements need to be completed before the visual identity established in the original references becomes fully apparent.
Because Chapter 4 has already explained these manufacturing steps in detail, the purpose of the case study is not to repeat every production procedure. Instead, it should show evidence that the same project actually progressed from approved digital design into physical manufacturing.
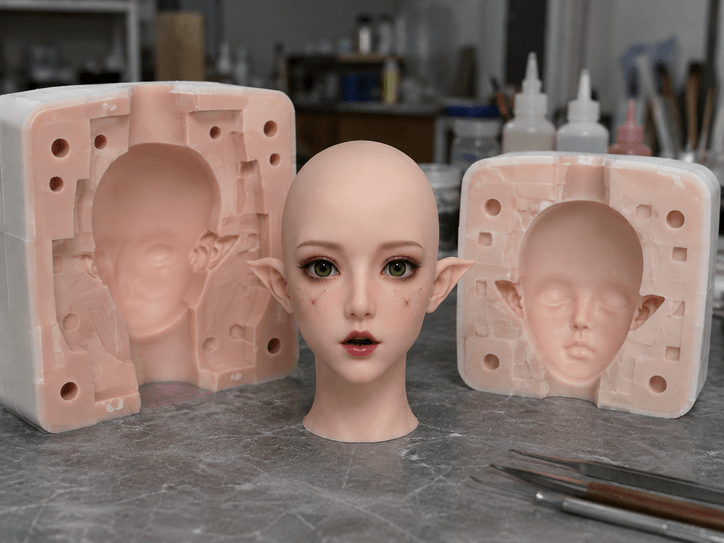
Real production of a custom character-based doll.
Comparing the Original Character With the Final Result
After coloring, hair and eye installation, assembly, and finishing are completed, the final silicone character can be compared with the original references and approved 3D model.
The comparison should focus first on the features that were identified as priorities at the beginning of the project.
Does the face retain the intended overall structure? Does the hairstyle preserve the character’s recognizable silhouette? Are the eye color, skin tone, and other signature details consistent with the approved design? If any digital features required adaptation for manufacturing, are those changes understandable when the physical result is viewed beside the original artwork?
A useful case study should not attempt to claim that every physical detail is pixel-for-pixel identical to a digital image. Instead, it should demonstrate how the character’s core visual identity was maintained throughout the transition from reference artwork to 3D modeling and finally to silicone production.
Original character recreated as a detailed 3D model.
What This Case Study Shows
A real project demonstrates why original character customization should be treated as a development process rather than a simple image-copying service.
The quality of the result depends on several connected stages: clear references, identification of important character features, careful 3D reconstruction, model review, realistic manufacturing decisions, and detailed finishing.
It also demonstrates why communication before production matters. When the customer and production team agree on the important features during the reference and modeling stages, there is a clearer target for the physical result.
Most importantly, the process provides visible checkpoints. The character can be evaluated first as reference artwork, then as a three-dimensional design, and finally as a physical silicone figure.
For customers considering a similar project, this provides a much more useful way to evaluate customization capability than viewing finished product photographs alone. A completed doll shows what was produced; a documented character → 3D model → production → finished silicone character case shows how it was produced.
How to Start Your Original Character Silicone Doll Project — H2
Once you have your character references and a general idea of the physical result you want, the next step is to have the project evaluated. You do not need to prepare a complete manufacturing specification before making an inquiry. Clear character references and a description of your priorities are usually the most useful starting point.
Because every original character is different, the design should be reviewed before the final customization plan is confirmed.
Step 1: Submit Your Character References — H3
Start by providing the clearest materials you currently have.
These may include concept art, AI-generated character images, digital illustrations, character sheets, 3D renders, or existing 3D model files. If multiple views are available, include front, side, three-quarter, and back references whenever possible.
You can also provide separate references for details that are not clearly visible in the main artwork, such as hairstyle, eye color, skin tone, makeup, body proportions, tattoos, or fantasy features.
You do not need to wait until every detail is perfectly documented. The initial materials can first be reviewed to determine whether additional references are required.
Step 2: Explain What Matters Most — H3
Along with the images, identify the features that are most important to the character.
For example, you might specify:
Must preserve: face shape, blue-gray eyes, silver hairstyle, pale skin, pointed ears, and overall body silhouette.
Flexible: minor makeup shades, small decorative details, or features that may need practical adjustment during manufacturing.
This distinction helps the customization team understand where visual accuracy should be prioritized if certain elements need to be adapted for physical production.
You should also provide your preferred height, body characteristics, or other physical requirements if you already have them.
Step 3: Feasibility and Customization Review — H3
The submitted materials can then be evaluated from both a visual and manufacturing perspective.
The review may consider whether the references provide enough information for 3D modeling, whether the intended proportions can be translated into a physical structure, and whether unusual character features require modification or an alternative production solution.
Complex elements such as highly exaggerated anatomy, fantasy structures, unusual hairstyles, or non-standard surface details may require additional discussion.
This evaluation is important because a visually appealing digital design is not automatically a production-ready silicone design.
If certain details cannot be reproduced exactly as shown, they should be identified before detailed modeling and mold production begin.
Step 4: Confirm the Design Through 3D Modeling — H3
After the project requirements are sufficiently defined, the character can move into 3D development.
The 3D model provides an important checkpoint between the original artwork and physical production. Instead of relying only on two-dimensional references, you can evaluate how the character looks from multiple angles and identify areas that need adjustment.
This is the appropriate stage to refine major facial proportions and other structural characteristics.
Once the model is approved, it can serve as the confirmed design reference for subsequent physical production.
Step 5: Move Into Production — H3
After the design and production requirements are confirmed, the project can proceed through the manufacturing stages described earlier in this guide, including physical model preparation, mold making, silicone production, coloring, hair and eye installation, assembly, and inspection.
At this point, major visual decisions should already have been resolved. The focus shifts from interpreting the character to manufacturing the approved design as consistently as practical.
For customers, this creates a clearer process with several important checkpoints:
Character References → Customization Review → 3D Model → Model Approval → Physical Production → Final Silicone Character
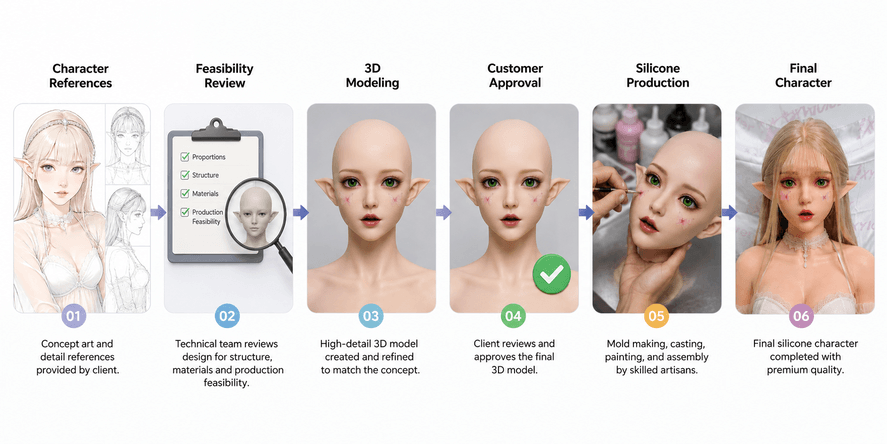
The complete character-to-physical-doll workflow.
Ready to Turn Your Character Into a Physical Silicone Doll?
If you already have an original character, the first step is simply to organize the references you currently have and identify the features you care about most.
You can start with a complete character sheet, several AI-generated images, an existing 3D model, or even a smaller set of illustrations. The available materials can then be reviewed to determine what additional information may be needed before modeling begins.
If you are ready to explore the next step, you can learn more about XYlover’s custom silicone doll service and how a personalized project can move from reference materials to physical production.
For complex original characters, it is better to discuss feasibility before assuming that every digital feature can be reproduced exactly. Clear references, realistic expectations, and approval of the 3D design provide a much stronger foundation for the final physical result.
Your character may begin as an illustration, an AI-generated concept, or a digital 3D model—but with the right development and manufacturing process, that design can become a real silicone character you can see in three dimensions.
Recent Posts


Product Categories